In this type of hut it is more efficient, when lashing on thatching battens, to make one lashing at each corner secure the two thatching battens, and when the span between fork poles becomes six feet or less to lash only to the corner poles, omitting the lashing to the intermediate poles. If the span between corner poles is greater than six feet it is necessary to lash battens to the intermediate poles.
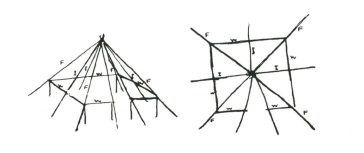
F—FORK POLES
I—INTERMEDIATE POLES
W—WALL POLES
LONG HUT
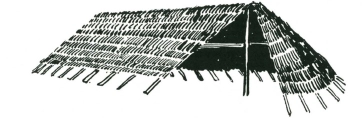
Hut, sixty feet long twenty feet wide, by sixteen feet high, built by five men in four days.
The end portion of this structure is basically the same as one-half section of the pyramid hut.
The length can be extended to any required distance by prolonging the ridge pole and using additional supporting fork poles. If the ridge is extended and in two or more lengths, these should be lashed together, and it is advisable to notch the ridge so it will sit snugly in the interlocking forks.
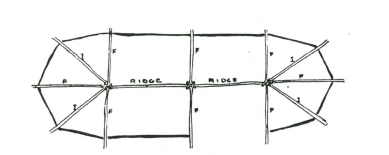
Plan of Long Hut. Intermediate poles required if fork poles are more than 6ft. apart.

When the span is more than 12 ft. lash collar ties on to forks and intermediate poles.
Wall pegs are driven in at a convenient wall height and thatching battens are lashed down. Refinements such as “lift up” sections for light and ventilation can be added if required.
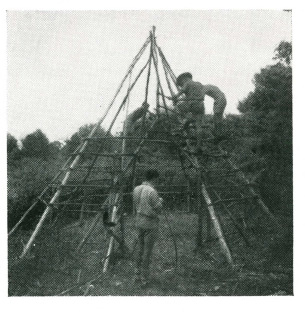
STEP BY STEP CONSTRUCTION OF A CIRCULAR HUT

1) First Construction: 30 minutes after start-off with four men on the job.
Note three fork poles to which have been lashed two rafters each, also entrance ridge and entrance poles with wall poles in position.

2) I Hour After Start: The basic structure is completed, a start is made with the thatch battens and wall battens, the door fork is swung.
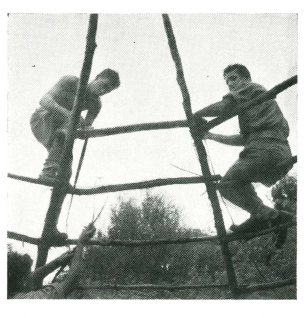
(3) Lashing on the thatching — battens to the rafters. Note how the lower battens must be strong enough to bear a man's weight.
(4) One and a half hours after start: Thatching battens are nearly all lashed on, door is complete, ready for thatching.

(5) Two and a half hours after start: The door is completely thatched, and the thatching is well under way on the roof.
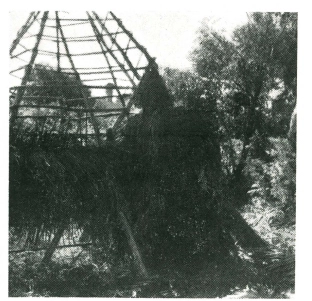
(6) Two and a half hours after start: Three rows of roof thatch laid. The hut, which was 15 ft. diameter from wall to wall, was completed one hour later, or three and a half hours after the start. No nails or purchased materials were used. This hut would be serviceable and weather-proof for six to ten years.
POLES AND STRUCTURES
All slopes to be completely waterproof should be not less than 45 deg. (although a 40 deg. slope will shed water). A slope that is 45 deg. is useful and will give good headroom. To work out the most efficient size of poles for main structure it is advisable to discover first the length of pole required and then the approximate diameter, excluding bark. It will be found that the proportion of spread to pole length at 45 deg. slope is as 4 to 3 between base of poles.
Example: If spread at base of poles is 20 ft., then pole length to ridge or crown of hut will be 15 ft. This proportion is constant and wall space or height is not allowed for in the calculations. In general, a wall height of 3 ft. to 4 ft. is sufficient.
Diameter of timber inside bark can be roughly calculated by allowing a minimum of 1 inch diameter at butt for each four to five feet of length. Thus, if a pole is 10 ft. in length, the diameter of wood clear of bark at butt should be not less than 2½ ins. or, if the pole is 20 ft. long, the diameter at butt should be not less than 5 ins.
If the span is relatively wide, or the timber used relatively light, it is advisable to strengthen the structure and prevent sagging or inward bending of the main poles by putting cross ties or collar ties so that the thrust or weight is thrown from one pole on to the pole opposite.
BRACING
Similarly with bracings, if long huts or lean-to type of huts are being built and there is no strong support, such as a growing tree, it is advisable to lash in diagonal braces that extend if possible from ground at one end to ridge at the other end. These bracings will make even a light hut quite storm-proof.
DOORS AND WINDOWS
Refinements such as doors and windows are completely practical in thatch huts, and very little extra work is involved. Windows are simply two (or three) fork sticks cut off short below the fork and with one long end projecting.
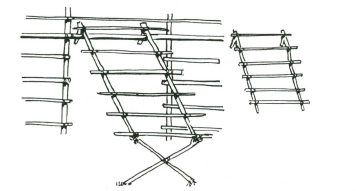
Window frames hook on to thatch batten above window opening.
Thatch battens are lashed to these fork sticks and the framework is lifted up and hung on to one of the thatch battens of the hut. In the general thatching of the hut this window space beneath the windows is left unthatched and the window frame is thatched as a complete unit.
1 comment